Profiles
In Curling IO, profiles belong to your members themselves. Members can reuse their profiles for registration across multiple seasons at your club, and also at other clubs, provincial, and even national competitions they may participate in.
Finding Profiles
You can access the list of all the profiles who have registered at your club, regardless of season, by clicking on Profiles in the top navigation.

To manually add a profile, click the New profile button. Usually curlers will create their own profiles, but occasionally you may want to create one for them.
![]()
To update an existing profile, click the Edit link next to it. Usually curlers will update their own profiles, but occasionally you may want to handle it for them.

Duplicate Profiles
Occasionally you will end up with duplicate profiles. This can and will happen for various reasons. Usually it's because someone registered again at a later date but logged in with a different email address than last time that also wasn't entered on the profile. If you spot one of these duplicates, you can mark one of them as a duplicate and eventually it'll get merged. Please make sure the first name, last name, and date of birth are identical between the two profiles.
![]()
Login as a Curler
You are able to login as one of the curlers at your club in order to help them complete their registration if they're struggling to do it themselves.
Just click the "Login as" link below the account's email / name.
Note: This only works with profiles for accounts that have already logged into the system. If instead you need to perform the registration for a profile that has never created an account, you can simply add your email address to the profile, and then you will see and be able to register with that profile from your own account.
What did a Profile Purchase?
Next to each profile there is a Purchased link. This will take you to the order item reports filtered by the profile. It's a convenient way to see what purchases a profile is associated with.

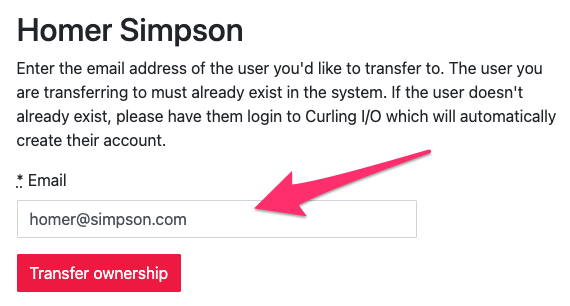
Transferring Profile Ownership
Occasionally you may need to transfer ownership of a profile to a different account (email address).
This can happen when a profile was created using a club staff account during an in person registration night, but the curler themselves later create their own account.
In order to transfer ownership to another email address, that email address must first have logged in at least once (to create an account within Curling IO).
- Go to the "Profiles" screen.
- Click on the name of the profile you wish to transfer.
- Click the "Transfer ownership" button at the bottom of this screen.
- Enter the email address you wish to transfer ownership to.
Importing Profiles
If this is your club's first season using Curling IO then you can import profiles from a previous season that do not yet have a profile in the system by uploading a CSV file.
We don't recommend this in general since it's not difficult for your members to register themselves, and your members will only see the profiles you imported for them if they login using one of the email addresses in the profile. That being said, it can be convenient to initialize your members profiles and potentially make it easier for them to register by pre filling their information.
CSV files can be exported from any spreadsheet or database program, usually by selecting the "File" menu and selected "Export as" or "Download as" and then selecting "CSV".
Click this link to see an example of a profile spreadsheet. Only the columns in red are required. The other columns are optional and may be ignored or removed from your import. You must make sure your column names are identical to this example spreadsheet's column names.
Required Fields
- First Name
- Last Name
- Date Of Birth
- Phone
- Street Address
- City
- Province
- Country
- Postal Code (or Zip Code)
- Emergency Contact Name
- Emergency Contact Phone
These required fields (columns) are highlited in red in the example spreadsheet linked to above.
Formatting
- The format for date fields is YYYY-MM-DD. For example; January 25th, 1980 would be formatted as "1980-01-25".
- The gender options are "male", "female", and "unspecified".
- Phone numbers should always include the area code and may optionally include the country code (1 for Canada and US). E.g. 1-416-123-1234
- Province should be a 2 letter abbreviation (for US clubs, you can enter the 2 letter state abbreviation here, but keep the column named Province). E.g. "ON"
- Country should be a 2 letter abbreviation. E.g. "CA" for Canada and "US" for United States.
- Twitter handles do not need to include the @ symbol.
- Zip code can be entered into the Postal Code column for US based clubs.
It's probably easiest to just look at the values in the provided example spreadsheet, if you're not sure on the format or requirement of a field.
Running the Import
Once you have a CSV to import, upload it by clicking the "Choose File" button and selecting it. Then click the "Import" button to run the import. We'll try to detect and ignore any duplicate profiles.
We keep a log you can review for every import in case there are errors due to missing fields or duplicate profiles.